Tuesday, July 31, 2012

Guarding the Crown Jewels!

Project 2: The Queen's Guards

No trip to England would be complete without a visit to a castle, right?  We're going to visit Buckingham Palace.

The palace, which was built in 1702 by the Duke of Buckingham and later sold to King George III, is Queen Elizabeth II's official London home.  It is also where official and ceremonial occasions are held.  You can tell when the Queen is home by looking at the flagpole on top of the palace.  When she is there her special flag will be flying.
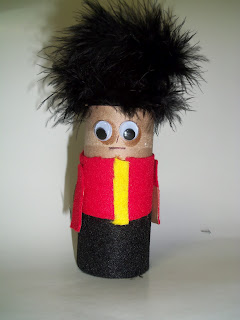
The palace is guarded by special members of the British Army.  They are not just prop actors in costume but actual guards from different regiments who all take turns keeping their Queen safe.  They all wear a similar uniform - black pants, red tunic and a very distinctive tall, black bearskin cap!! Since the kids have a castle they play dolls in, I thought the castle should have a few guards.  Our next project :  The Queen's Guard !


For the project you will need:
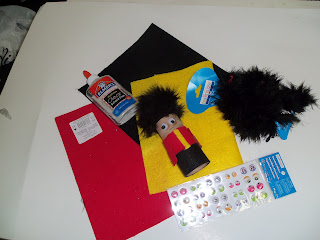
  • Toilet or paper towel rolls.  Cut paper towel ones in half.
  • Red, black and yellow felt.  I used sticky-back kind.
  • Eyes or a pen to draw them on
  • Something fluffy and black for the hat.  I found a small black boa at Michaels but was originally going to go to the fabric store and buy some black fur.
  • Glue if you are not using the sticky-back felt.

Cut a piece of felt about 1 1/2 inches wide and wrap around bottom of paper roll.  Cut another piece of red felt about the same size and wrap around middle of roll. Cut two arms from the red felt and glue or stick them in the proper position.


Next glue,stick or draw on some eyes and a mouth. The guards aren't supposed to smile- they are always very serious, but my son's ended up with a big smile :) For the hat we glued some of the fluffy boa onto a piece of felt and stuck it to the top of the roll.  Sorry, I missed that step in the photos!  Then, voila!

Isn't he cute?  The kids and I each made one and now our castle has it's own regiment of guards.  Barbie will sleep safely tonite :)


Project 3: the Crown Jewels

Seen by millions of visitors each year, the crown jewels are kept in the Tower of London, where they have been kept under guard since the early 14th century.  The collection contains the ceremonial and symbolic sceptres, orbs, rings, swords, spurs, bracelets, and robes that have been used in the coronation ceremonies of British rulers for centuries.  The oldest piece is the 12th century Anointing Spoon which is used to anoint the newly crowned king or queen with holy oil.  The jewel in the crown (pun intended) of the collection is St. Edward's crown.  Last worn by Elizabeth II during her coronation on June 2, 1953, it is made of gold and decorated with sapphires,tourmalines,amethysts, topazes and citrines!!


Our project, while equally as beautiful (yeah right) will cost you only a fraction of the cost of this beautiful crown!  You will need:


  • Foam or paper crowns.  These are from Michaels and were very cheap and nicer than paper I think.
  • Glue
  • Sequins and plastic gemstones.  You can use the real thing if you have a bunch of gems lying around, but in our castle the kids get plastic gems :) Diamonds are for mommy.

You probably already guessed it.  Glue the gems and sequins to crowns and let dry.  Then have an elaborate coronation ceremony complete with parades and fireworks to celebrate the crowning of the new King and Queen!! Or just make them pose for a picture.


Three cheers for the new King and Queen!!  The queen looks like she's about to have me beheaded!! Someone tell her our next post has treats ...





Monday, July 30, 2012

A brief history of England ?!

I have attempted to condense over 500,000 years of history into one post - here it goes...
  • 500,000 BC 1st people arrived from Europe on landbridge.
  • 6500 BC Sea level rises and landbridge flooded - Isle of Britain is formed
  • 2000 BC  Stonehenge is completed
  • wars, wars, wars
  • 43 BC Romans ivade and rule for next 400 years
  • 50 BC  London is founded
  • 410 AD Romans leave but Anglo-Saxons invade
  • wars, wars, wars
  • 1055 AD Westminster Abbey is completed
  • 1348 Black Death (bubonic plague) kills half of population
  • wars, wars,wars
  • 1591 William Shakespeare's 1st play is performed
  • 1620  Pilgrims set sail for America aboard the Mayflower
  • 1652  Tea is introduced.
  • wars, conflicts, strife
  • 1868  NJoseph Lister invents disinfectant
  • 1876  Alexander Graham Bell invents telephone
  • 1991  Sir Tim Berners Lee invents World Wide Web !!!
Ok, now I know I skipped all the kings and queens, and the great wars, and the many, many different invasions and conquests that occurred but I would have had to fill many pages and I just couldn't do that to you (or myself).  If you would like to learn more please visit your library or google "history of England".  England is a country with a rich and diverse background which is probably why so many books, plays, movies and songs have been written about it.  Please accept my apologies for abbreviating it so harshly.
Now let's EAT!!

Project 1: Toad in a Hole

When I told people we were going to eat English food this week I got so many moans and comments about how bad English food is...well, they were wrong!! So far we've had Fish and Chips, which were delicious, and Toad in a Hole :)  When I told my daughter we were making Toad in a Hole, she looked at me and told me straight out that she was NOT going to eat a toad!!  Luckily for her real toad is not part of the recipe.  You will need:

  • 1 1/2 cup of all purpose flour
  • 1 teaspoon salt
  • pinch of pepper
  • 3 eggs beaten (I only have 2 in the picture)
  • 1 1/2 cups milk
  • 2 T melted butter
  • 1 T vegetable oil
  • 1 lb of Bangers (sausage made with pork and breadcrumbs) or any other good, mild sausage
We live in the SF Bay Area and have access to many international ingredients.  I realize many of you may not so I will try to make recipes that have easily substitutable (sp?) ingredients :)  Now on with the show.
 
1.  Combine flour, salt and pepper in bowl.  Add beaten eggs, milk and melted butter and stir until everything is smooth.  Cover and let stand 30 mins.
2.  Coat bottom and sides of baking dish with oil and put in bottom third of oven .  Preheat oven and dish to 425'.
3.  Brown sausages in skillet.  I didn't feel like there was going to be enough sausage (and I wasn't sure if we'd like bangers) so I added 3 hot dogs too :)
4.  When oven and pan is preheated, pull rack out slightly and (carefully) add sausages to pan.  Pour batter over the top of the sausages and cook for about 25-30 mis until golden and puffed up!!
 
 
Isn't it lovely! It was super yummy too!! The batter cooks up and around the sausages and makes it's own little bun.  The bread part was crispy on the outside and soft and fluffy on the inside.  The bangers were very good too.  I used this brand but I think it would


work well with any kind of sausage.  The kids ate it and the husband ate it, so it is a recipe I will have to remember!!  Plus the look on your friends' faces when you serve them Toad in a Hole is priceless :)  Enjoy!!   

Week 2: Tally Ho! We're off to England!

Week 2:  Tally Ho!  We're off to England! (and a lesson in latitude and longitude)


Pip, pip cheerio and all that, today we are going to start our adventure in England!  We are going to start all our adventures by finding them on our map.  Do you have a map or a globe? There are many online or you can purchase a large wall map at most office or educational stores- kids love to see where they live and it will be fun to put a sticker on every country as we visit! 

 Ok, how do you find a country on a map if you don't know where it is?  Latitude and Longitude! Ok, but what is that?  It is a system for charting locations on a map where the Earth is divided up into a grid.  The horizontal lines are Latitudes (aka parallels) and they are all equally spaced 69 miles (111 km) apart, with the equator being the middle.  An easy way to remember is to think of latitude as being a ladder up and down the earth- get it? "ladder"tude :)

Longitude (aka meridians) are always the second coordinate given and they are the vertical lines that meet at the poles and are widest at the equator (also 69 miles or 111km).  0' is located at Greenwich, England and known as the Prime Meridian.  The lines extend east and west from there and meet at 180'E and 180'W at the International Date Line in the Pacific Ocean. 

So now you should be able to find any place you are looking to find, as long as you have the coordinates :) 

 London (the capital of England) has the coordinates of  51N, 0.1W

Because of it's distance from the Equator and the fact that it is an island country, England's weather is usually fairly mild and sometimes downright wet and chilly. In fact, since recorded history, the summer of 2003 was the first time temperatures hit the 100' mark.  Better wear layers...and carry an umbrella!


Friday, July 27, 2012

The New and the Old

Project 3: Warhol inspired portraits

When talking about art in America, Andy Warhol immediately springs to my mind.  The American artist (born to immigrants) was a leading figure in the Visual Arts (or Pop Art) Movement that flourished in the 60s.  He often painted iconic images or people using brights colors and made several reprints in different color combinations that made his works both fun and unique.  We tried to accomplish a similar look in our project.


My daughter broke her arm at school this week and while she's not in any pain, her mobility is somewhat limited.  So we came up with this project that she could color and put on the fridge. She really got into it at first but then got a little tired of coloring, so it would probably be best done over the course of a few days or have a few kids each do one.  My son isn't a big fan of coloring so I did them with my daughter.  I think they turned out pretty cool and I was able to give her a look at a different kind of art from a man who was a different kind of artist. 

Top ones done by me.  Bottom one done by my 5 yr old.


Project 4: The tippy tipi

I'm very proud that this week I've given my kids a lot of information about the country they were born in, about the immigrants who came here to flee oppression or simply to have a better life, but what about the people who were already here from the very beginning? In my (humble) opinion the Native Americans are not very well represented in the History of America.  They have a culture that is rich with wonderful stories and their philosophy and attitudes towards the world around them is something we should all study.  They lived off the land and they took CARE of the land. 

 The native americans lived in many different types of dwellings but perhaps the most iconic is the tipi.  Now, I know a lot of you are thinking that I made a typo and it should be spelled teepee but, well, you're wrong.  The word comes from combining two root words - the Sioux word "ti" meaning to dwell or live and "pi" meaning to live in.  Used by many tribes, the tipis were portable conical shelters made from canvas (or hides) and long poles.  They would be placed in a circle and each family slept inside with a small fire burning in the middle to keep them warm.  Our project is not made with buffalo hides or pine poles.  We live in 2012 and we used materials of the day.  I'll bet if the Sioux had access to PVC pipes at the local hardware store they would've used them too.

Anyway, we started with five 9' pieces of PVC pipe ($2 a piece), 2 9x12 brown paper dropcloths or some sheets, rope, and tape - lots and lots of tape!!


Make a conical shape out of your pipes, and twist a length of rope around and under and through to hold it all together. If your kids are short you will need another grown up and maybe even a stepstool :)

Now wrap the paper or sheets around the structure as well as you can.  In the picture you can't see all the packaging tape I used to achieve this but it was an impressive amount.


Next have your children (and a cousin) decorate with symbols from nature.  We have suns and trees, orcas and buffalo, some birds and a terrible storm.  They loved being able to see the decorations from both sides since the paper was on the thin side.


Now pile in and enjoy!  They furnished theirs with pillows and blankets and played for quite awhile. Maybe tonite we'll have a campout!

Thursday, July 26, 2012

Let's Eat!

 Project 2: The Great American Melting Pot

Well, Lady Liberty turned out well and is now shining her beacon for all the immigrants to be welcomed into our backyard! Not surprisingly, all the recent immigrants are gnomes but we will work on backyard diversity.  Our next project is a cooking one - YUM!  As I was perusing recipes that were "American" in nature I came upon a problem, with America being such a culturally diverse country most of our food has been influenced by other cultures and I wan't able to think of any that were distinctly American from inception (and my kids are kinda picky too).  I suppose I could've made a wild rice and corn dish but that didn't sound very yummy so I had an idea.  I went to the store and bought cheeses and breads from around the world and we made what I called The Great American Melting Pot!


We used our slow cooker as "the new land" and added some
  • Mexican Oaxaca cheese
  • Greek Feta
  • Dutch Gouda
  • Spanish Iberico, Manchego and Cabra al Vino (Trader Joes sampler)
  • Irish Cheddar
  • French Brie (rind removed)
  • English Cheddar
  • American slices
  • about 1/2 bottle of beer and a few shakes of Cajun seasoning
While that was getting all melty and delicious we cut up some
  • French baguettes
  • Hawaiian sweet bread
  • Middle Eastern Flat Bread
  • Italian breadsticks
  • French croissants
  • Polish Polska Kielbasa sausage
Then our feast was ready. All the "cultures" blended very well together (maybe the beer helped) and it was a delicious, albeit not very healthy, meal and then something happened that I had not expected.  A division in the "country"!!  Apparently, I cooked it too long and my pot of cheesy goodness separated into two distinct (but still delicious sides).  I immediately saw the symbolism in this - when the people in a country are happy (and just the right temperature) they are cohesive and one, but when a problem (too much heat) occurs they can very quickly take sides and no longer act as one nation.  A lesson has been learned.

Tuesday, July 24, 2012

Week 1: GO USA!

Week 1: GO USA!!!

Are you ready for the Olympics?  I'm not a huge fan of sports (as my waistband shows) but I love cheering on my country.  When I originally was thinking about starting this blog I was going to start in January, thinking that a logical beginning to the 52 weeks....BUT the Olympics starting on Friday July 27th got me excited and ready to start a little early!!  So here we go.  Our first week of the great adventure is what you'd call a "staycation", the good ol' US of A.

Get out that world map and/or globe and find it. We are located at 38' N latitude and 97' W longitude. Our neighbors are Canada to the north and Mexico to the south.  The population is (give or take) 311,591,917 people.  This population is made up of people from all areas of the world which is one of the reasons why America is called the Great Melting Pot!

I think most of you know the story of Christopher Columbus sailing the ocean blue, blah blah blah, I don't want this to be a history blog so I won't fill pages with the colorful and.actually, very interesting story of how our founding fathers started this country to escape the control of the British Empire. Instead, I will share some of the projects that I did with the kids and some of the fun facts we learned while we were doing the projects.  

Art Project: Lady Liberty

When I think of the ultimate symbol of America one image comes to mind first - the Statue of Liberty.  Designed by Auguste Bartholdi as a gift to the US from France to celebrate our 100th year of indepedence, the statue took 9 years of almost nonstop work to complete!  Ours is of considerably smaller scale and took us about a day, including drying time :)


Start with a soda bottle (half full of water for weight), aluminum foil, tape, bendable sticks (we used large cakepop sticks but popsicle sticks or a tree branch would even work), newspaper, flour and water to make paper-mache paste and green paint to give Lady Liberty her patina.


Make a head out of a wad of foil and cut 7 spikes off of the stick and poke them into the head.  They will probably keep falling out and you'll think you're doing it wrong but keep at it :)  BTW, did you know that her seven spikes represent the seven continents of the world?


Give the lady her torch by taping another stick with a wad of foil onto the bottle.  Add another arm to the side because ,well, she should have two arms.


Recruit two adorable kids to rip newspaper into small pieces or strips.  I happen to own these two but you may borrow them if you need to.  They are really good paper rippers.


Mix flour and water together to make a paste the consistency of cake batter.  Dip paper in paste and apply to form.  Cover completely and layer where you need thickness. Try to use strips coming from different directions to make it stronger and hold together during drying.  Let dry - ours took from about 2pm to noon the next day.


             Paint and Enjoy your very own Statue of Liberty!!

      
                                                        Give me your tired,your poor,
                                                        Your huddled masses yearning to breathe free,
                                                        The wretched refuse of your teeming shore,
                                                        Send these, the homeless, tempest-tost to me,
                                                        I lift my lamp beside the golden door!"
                                                                             -Emma Lazarus


The above is a portion of the poem by Emma Lazarus that is engraved on a plaque at the base of the Statue.  The statue is a symbol of welcome for all the immigrants coming to the US and has become a universal symbol of freedom. 
 Here are a few fun facts: 
  • There are 354 steps to climb to the top of her crown.
  • Her green color comes from the chemical reaction between her copper coating and water.
  • She is a very large lady weighing in at 450,000 pounds. Her 25 foot long feet would wear a size 879 sandal!

Monday, July 23, 2012

Pack your suitcases and let's go!!!!!

Welcome, you are invited to join my family, the neighborhood kids, and whoever else I can get to join us, on a worldwide adventure.  Each week we will immerse ourselves in learning about a different country, it's people and customs, try some recipes or new exotic foods, do some fun art projects that reflect the country, learn about some extraordinary people or places and, maybe, even learn to speak a few words and count to ten in the native language!  It will be fun, it will be educational for both kids and adults and it will help to build an acceptance of cultural differences in the people that we share this Earth with.  I hope you will join us as we start this adventure .  My suitcases are packed, are yours?